
Introduction
Congratulations with the purchase of the VAP, Venue Advertisement Plaque.
With these boards you can advertise your company, shop, club or venue at any place in Second Life.
They are transferable, so you can give them away (after configuring) to anyone that wants to help advertising your venue.
Automatic group invite (with smartbots), or chatlink group invite (if you dont want to use smartbots), landmark giver and map locator, sends IM to designated contact, website clicky and information notecard giver.
Top section with your logo and 4 functional buttons, bottom section with information pane, all in one prim.
Optionally can send statistics on clicks at the end of each week to Email.
Placing the VAP
The product you received is 'boxed'. Rez the box by dragging it from your inventory onto an empty spot in world.
Left click the box to open it's content and do copy all to inventory. Take care not do this procedure with the actual board, because then you will end up having the scripts inside your inventory and a not functioning product.
You will now have a folder in your inventory called: [SHX-VAP]
Inside the folder you will find 10 VAP boards. Plus:
- SHX-VAP-Frame - Full mod frame to be used at your convenience for placing the VAP board
- SHX-Group-UUID - A simple rezzeable box to find your group UUID identifier
- SHX-Avatar-UUID - A simple rezzable box to find any Avatar UUID identifier
VAP Functions
- Group invite - This can be either: Automatic invite via a bot (requires that you rented a Smartbot) or it will say a message in chat with a clicky to have the user join the group themselves.
- Landmark giver / Map teleport - This gives a landmark to whoever clicks and opens the map with the location
- Contact us - A way to contact a staff member, menu dialogue driven
- Website - Menu dialogue clicky to visit your website
- Information (bottom text block) - When clicked on that section, a notecard is given out
Configuring
To configure the VAP you have to do a few things:
Changing the interface images
- Make an image for the top section (1:1 ratio) and an image for the bottom section (2:1 ratio). To help you get started, we have a template in Photoshop format: VAP-Templates.
The touch areas of the upper section can be seen in this: image. (also included in the template as a layer)
You can make the buttons as large or as small as you want, as long as they are on each touch-area. - Import the images you made into Second Life.
- Delete the files: image-bottom and image-top from the contents of the VAP (see image 1) and place the files you imported into the contents of the VAP, giving them the exact same names: image-bottom and image-top.
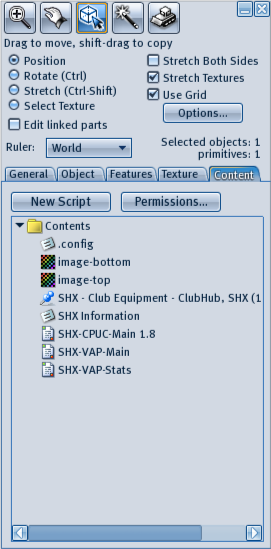 Image 1 - VAP Contents
Changing the Landmark / Map Teleport
- Delete the example landmark from SHX first (as seen in image 1)
- Drop your landmark into the contents of the VAP. There should only be one landmark inside,
Changing the Information Notecard
- Delete the example notecard from SHX first (as seen in image 1)
- Drop your notecard inside. It does not matter how it is named, as long as there are only the .config notecard and yours in it.
Set Contact for the Contact us function
- Get to know the avatar UUID of the designated contact by using the included SHX-Avatar-UUID box: rez it and let the designated avatar touch it
- Copy the UUID from chat with CTRL-C
- Modify the .config by doubleclicking the file in the contents of the VAP (see image 1)
- Paste the UUID behind the CONTACTUUID: keyword
- Save the config.
Group configuration for Group invite with Smartbots
- Make sure you have set up a bot via Smartbots and that it's active.
- Modify the .config by doubleclicking the file in the contents of the VAP (see image 1)
- Set the option: SMARTBOTS: YES
- Type the name of the group behind the GROUPNAME: keyword
- Save the config.
Group configuration for Group invite without Smartbots
- Get to know the groupUUID of the designated group by using the included SHX-Group-UUID box: rez it, set it to the designated group and touch it.
- Copy the UUID from chat with CTRL-C
- Modify the .config by doubleclicking the file in the contents of the VAP (see image 1)
- Set the option: SMARTBOTS: NO
- Paste the UUID behind the GROUPUUID: keyword
- Make sure that the JOINMESSAGE: is not empty
- Save the config.
Set website location for the website function
- Modify the .config by doubleclicking the file in the contents of the VAP (see image 1)
- Type the website behind the WEBSITEURL: keyword, or leave it blank to disable this function if you do not have a website
- Save the config.
Weekly statistics to Email
- Modify the .config by doubleclicking the file in the contents of the VAP (see image 1)
- Type your Email address behind the EMAILADDRESS: keyword, or leave blank to disable this function
- Make sure the following is set: EMAILSTATS: YES
- Check the settings: GMTOFFSET: and DST:, they determine the timezone and subsequently at what time the statistics are send to your email address. That is at sunday midnight. If you are going to place a lot of these boards, enabling on every board the statistics, you might want to change the timezone on several, to prevent Second Life to temporary block the Email function if a certain maximum is reached.
- Save the config.
Weekly Statistics to Email
You can set each VAP board to send out a weekly Email as shown in image 2. See the previous section how to configure the VAP to do that.
There is one thing to consider: Second Life has a build-in spam prevention measure for sending Emails on a per user basis. This means that if you are going to place more then 20 boards with the Email option enabled and having it set to the same timezone, some boards will not be able to send out the Emails. To circumvent this, place some of the boards on a slighty different timezone. In Example, if your timezone is -7, put some on -7.12 (60/12 = 5 minutes difference).
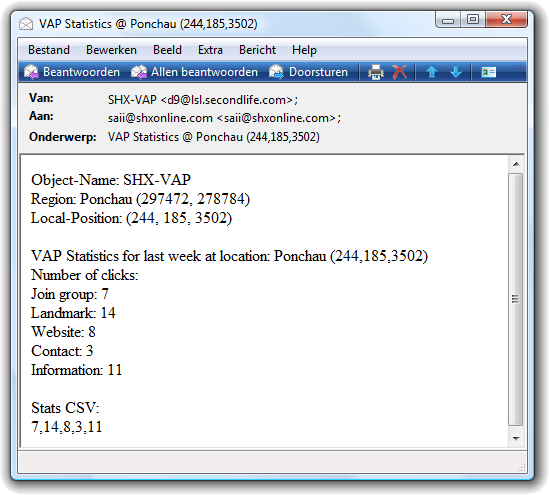 Image 2 - VAP Statistics
Giving a board away
When done configuring a board, and you want to hand it out to someone so they can place it on their land, you probably want to prevent them to change the configuration.
Just simply uncheck the modify property of the VAP object, before handing them out. Or alternatively, uncheck the modify property of the items in the VAP contents.
Do not that in the latter case, they will be able to remove the items and re-use it for their own purpose. But of course, that is something you might want.
Suggestions
All SHX products evolve over time due to new insights, changes to Second Life, but most of all, because of your input.
If you have any suggestions, please contact Saii Hallard via IM, or just send in a notecard.
1.0 Default Configuration (.config)
# ====================================
# Config parameters 1.0
# Keep keywords in upper case, and place values behind
# the keyword after the : seperated by a space
# ====================================

# CONTACTUUID: -> The Avatar UUID Identifier of the avatar that is used for the "contact us" function
# Leave blank to not use the function
# Use the SHX-Avatar-UUID box included in the product box you purchased to get the 36 character UUID
#
CONTACTUUID:

# WEBSITEURL: -> Your website URL
# Leave blank to not use the function
#
WEBSITEURL:

# EMAILADDRESS: -> The Email Address to send lists and statistics to
# Tip: Use an automated forwarding script in your Email program to send the info to more people
#
EMAILADDRESS:

# GMTOFFSET: -> Set to the offset value of your time location. At midnight the stats will be send (if you enabled it)
#  ie:  for PDT the value would be: GMTOFFSET: -7
#  for Deutschland/Nederland/France:  GMTOFFSET: 1
#
GMTOFFSET: 1

# DST: -> Daylight saving time, set this to ON of OFF
#
DST: ON

# EMAILSTATS: ->  Set to YES or NO to enable Emailing daily statistics (visitors, new daily residents,min/max residents online)
# A valid Emailaddress is required in the EMAILADDRESS parameter above
#
EMAILSTATS: YES

# SMARTBOTS: -> Enable or disable smartbot direct group invite
# Note that this requires that you have registered and activated (paid) for the smartbot service
# Smartbot website: http://www.smartbots2life.com/
#
SMARTBOTS: YES

# GROUPNAME: -> Groupname needed to activate the smartbots feature, leave blank if you do not wish to use smartbots
#
# Note that this requires that you have registered and activated (paid) for the smartbot service
# Smartbot website: http://www.smartbots2life.com/
#
GROUPNAME:

# GROUPUUID: -> Group UUID Identifier. Use this in stead of the Groupname, or when you do not want to use Smartbots
# Use the SHX-Group-UUID box included in the product box you purchased to get the 36 character UUID
#
# Note that this setting overrides the groupname. Use one or the other, not both.
#
GROUPUUID:

# JOINMESSAGE: -> With this you can set the join message
# If for instance, your group is closed for enrollment, you can change the
# message into something like: Contact Saii Hallard to be added to the group! Click here: secondlife:///app/agent/9461d333-7c39-4c02-aeaf-9f44943b125e/about
#
# Leave this option blank, to not use a message
# Use the %grouplink% placeholder to display a link to join the group ie: Click here and press the JOIN button to join our group: %grouplink%
# %grouplink% will be replaced in chat with a http clicky to the group, but requires that you have set the GROUPUUID
#
# When using Smartbots, any setting with JOINMESSAGE is ignored
#
JOINMESSAGE:  Click here and press the JOIN button to join our group: %grouplink%