Introduction
Congratulations with the purchase of the DJ HUD!
This HUD is able to work together with DBX type of booths and SRC type of receivers.
Wearing the HUD
Right click the HUD in your inventory and select Wear from the sub menu. Default it will use the Top Left position. You can use any HUD position, it will auto adjust it's position relatively to the screen edges. It is not advised to use the center/center2 positions.
First Use
When you use it the first time, it will automatically expand to show the full HUD. Use the Hide button (bottom right icon) to minimize the HUD. Click on the Show button on the minimized HUD to show the full HUD again.
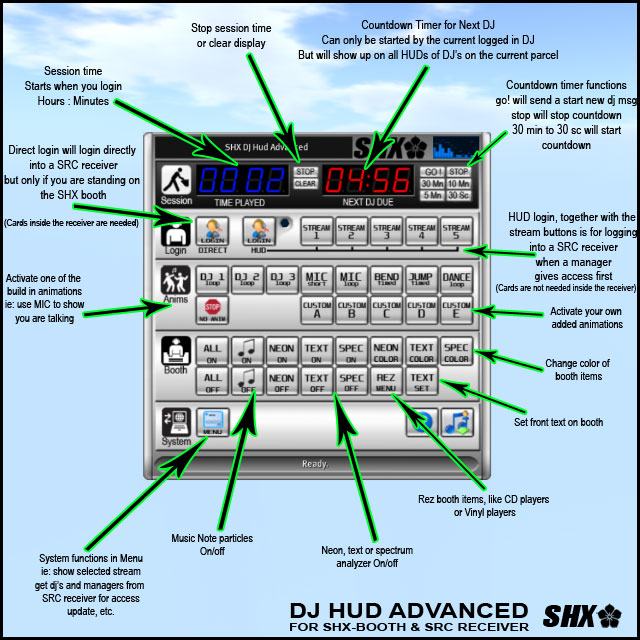
The HUD is divided in 5 sections: Session, Login, Anims, Booth and System.
In the Lite version, the session and login sections, although visible, are not working.
Session
Time played, in HH:MM. Starts when you login. Use the stop button to stop the timer and clear to clear the timer.
Next DJ Due, in MM:SS. Starts when another DJ wearing the DJ HUD will initiate the timer with one of the 4 buttons, 30 Min to 30 Sc.
The GO! and Stop buttons next to the Next DJ Due, as well as the 4 initiate countdown timer buttons only appear when you logged in.
Click GO! when your session ended, it will stop any initiated timer and send a "NEXT DJ" instruction to any other HUD in range. In stead of using this button, you might want to opt for using the countdown timer:
When you know in how long approximately your session will end, you can use one of the 4 countdown timers. It will start counting down, ranging from 30 minutes to 30 seconds depending what you clicked. Not only you will see this, but more importantly, other DJ's that are in range (same parcel only) will see the countdown as well.
When the timer runs to zero, it will automatically send the GO! command and notify any huds in range that a next DJ is due. This way you do not have to worry to inform the next DJ and concentrate on your DJ set.
Login
You will notice that there are two login buttons.
The first one is a Direct Login button, and does what it says: It logins directly into the SRC receiver. This requires that you have been added to the SRC receiver (with notecards). See the SRC manual on how to achieve this.
The direct login has no feedback, so make sure the SRC Receiver is on the same parcel and in range (100m). Furthermore make sure the REMOTE option in the SRC Receiver is set on.
The second login button (HUD login) does not require you to been added to the SRC receiver. With this login button, the login procedure has to be started by a manager of the SRC Receiver. (he/she clicks on DJ HUD and will find you when you are in range). When granted access, the light next to the login button will flash, indicating you are allowed to login.
You just click on login and your session will start.
Do note that for the HUD login button to work, you have to select one of the stream buttons first (1 to 5). These stream buttons will load two cards that are inside the HUD:
.stream1_streamcard & @stream1_djcard
In most cases you only want to change the URL, do this by editing the appropiate streamcard. You can use up to 5 streams this way.
For more information about the use of these cards, click here.
More advanced users may want to edit the way their text and images are displayed on the SRC Receiver. Consult the SHX Scripts manual for details.
image 1: Hud overview

Anims
The Anims buttons are shortcuts for the animations stored inside your DBX Booth.
To have these buttons working you need to be"sitting" on the booth.
The Custom buttons only work when you have added your own animations to the booth.
Booth
The booth buttons are shortcuts for the functions of your DBX Booth.
With the on/off buttons you can quickly enable or disable certain features of the booth.
The color buttons will show a color menu to colorize parts of the booth.
The Rez Menu button will present a menu, where you can select certain items that will be rezzed. Note that depending on what you select, you have to make sure there are enough prims available on your parcel to be able to do this.
The Text Set button will let you change the text on the front via chat. But you can do this of course also with the "/55 text MyText" command.
System
The system section contains three buttons, menu help and minimize.
The menu button will show a menu with system functions, such as making connection to your SRC receiver to get DJ lists and Manager lists, update etc.
Extra Notes
If for some reason the HUDs will not communicate, please check that the parcel has a name. If the parcel has no name set, the huds are not able to communicate.