Introduction
Congratulations with the purchase of the VWB, Visitor Welcome Board!
Placing the VWB
The product you received is 'boxed'. Rez the box by dragging it from your inventory onto an empty spot in world.
Left click the box to open it's content and do copy all to inventory. Take care not do this procedure with the actual board, because then you will end up having the scripts inside your inventory and a not functioning product.
You will now have a folder in your inventory called: [SHX-VWB-200] or [SHX-VWB-210]
Rez the VWB (named: SHX-VWB-200, or SHX-VWB-210) by dragging it from your inventory onto an empty spot in world.
First Use
When you rez the board for the first time, it will automatically set the group (used for inviting people) to the group that it is set to.
This will of course be the group tag that you are wearing when you rez the board.
Setup in a nutshell:
- Change the object group, click on set group id in the options menu. Then change the group back when needed
- Delete the landmark inside and drop your own
- Change the sensor range (in Options-Sensor)
- Edit the Information-EN notecard inside (add more languages if needed)
- Edit the .config notecard inside, set your Email Address and other options on or off
- Edit the managers list notecard to give others access
- Set the Access in the Access menu to your choice
- Change colors and fonts to your liking
- Optionally you can activate the Smartbots feature
We will describe the above steps in more detail below:
Changing the Group for invitations
To make it easy for you, the board is capable to get the group ID, name and image, but it needs to know what group of course.
This can be achieved by temporarily changing the board to the group you want to use and give it an instruction that you want to use that group.
The procedure how to do this is as follows:
When you want to change the invitation group, first temporarily change the group of the board like shown in image 1.
Then click on "SET GROUP ID" in the options menu (see image 9).
Of course you want to keep the board to the group that owns the land (see image 2). Just change the group back again (see image 1) to the land group.
The board will automatically fetch the group image and will display some information in chat. Note that sometimes it might fail to do this; This is because the webserver from Linden Lab sometimes fails to respond. Just wait a few minutes and try again.
If your group is untagged for "Show in search", then the board will be unable to get information from the server.
In this case it will use the texture inside the board named: group_image (see image 3).
You can opt to change the show in search (note that server changes can take up to 12 hours), or replace the group_image texture with one from yourself, or just edit the board and drop your own texture on it.
image 1: Change group

image 2: About Land

Internal Sensor
The VWB has an internal sensor, which can detect avatars around the board up to a 96 meter radius. Default it will only detect in a 10 meter radius. Change the sensor range via the menu dialogue: touch the board, click on [Options], then on [Sensor].
Make sure it will not overlap into the area of your neighbour (if you have any) to keep everyone happy.
External Sensors
Included with your device are two external sensor objects: A sensor like the internal one and a collision detector.
To make use of external sensors, you have to enable them by modifying the .config notecard inside the VWB board and set:
EXTERNALSENSORS: ON
 VWB - External Sensors
We added the collision detector for situations where you only want to trigger a "hit" at a specific entrance. For instance right below the landing point. Note that to make the collision trigger, you have to set the landing point more then a meter above the collision detector (while floating above it), so people drop on the detector when they land.
Each sensor has some options, like sensitivity, the range, but also a sound and effect switch. Additionally you can show/hide the sensor as well by clicking the Show button.
Touch the sensor to bring up a menu dialogue shown below.
When the sensor is set in place, you have to turn it on by clicking the (( ON )) button.
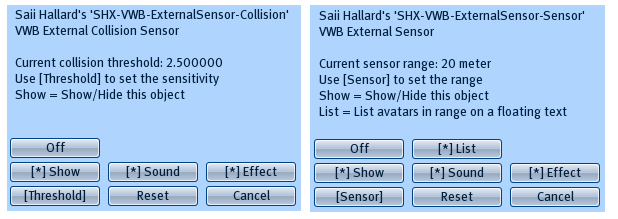 VWB - External Sensor Menu Dialogues
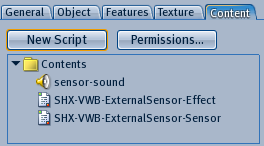 VWB - External Sensor Contents
The sound option calls a file that is inside the sensor. You can replace it with your own sound by removing the sensor-sound file; Then drop your own sound file, but name it exactly: sensor-sound as shown in the image above.
The (particle) effect can be modified as well. The "SHX-VWB-ExternalSensor-Effect" script is full permission, so you can add your own particle effect. If you make use of the wonderful Porgan you can generate a script-snippet that can be inserted in this effect script.
NOTE: The sound and effect trigger when someone come in range or collide with the sensor. It is not an indication if someone is new to the detected list of avatars. That means that if you have a crowded place, it's best to leave those options disabled. Initially they were meant to make it more clear when they trigger, for testing purposes.
Some words of advice:
- Each sensor have it's own menu dialog (touch it!)
- DO NOT DEED!; the sensors will only work when the owner of the sensor and the owner of the VWB are the same
- Try not to overlap sensor ranges, as this will overload the vwb with triggers
- Do not fill your region with sensors, try to minimize the use...because using too many will also overload the vwb with triggers
- Reset the sensor when you have reset the vwb visitorlist and do not get a sensor trigger; The sensor also keeps a list of sensed avatars to prevent needless triggers
Change the landmark and information notecard
Since the board is capable of giving landmarks and an information notecard, you will want to change the enclosed examples.
Just edit the information notecard (do not rename it!) and put in the information you want to give to visitors. (see image 3)
Delete the landmark that is already there (from our store), and drop in your own landmark.
The default card in is: Information-EN (take care, it's case-sensitive!) and will be used when no other language specific card exists
Languages supported and their respective landcode:
English - EN
Nederlands (Dutch) - NL
Deutsch (German) - DE
Français (French) - FR
Italiano (Italian) - IT
Español (Spanish)- ES
Portugués (Portuguese) - PT
Magyar (Hungarian) - HU
Русский (Russian) - RU
Українська (Ukrainian) - UK
Polski (Polish) - PL
Dansk (Danish) - DA
中文 (简体) (Chinese) - ZH
日本語 (Japanese) - JA
한국어 (Korean) - KO
When offering an information card for Japanese visitors for example, make a card with the name:
Information-JA
When a card is not found for the respective language, it will give out Information-EN
If you want to have professional translations done, contact: Peter Stindberg of Babel Translations
 Image 3: contents
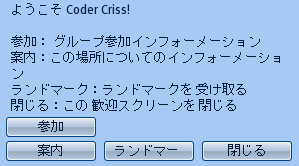
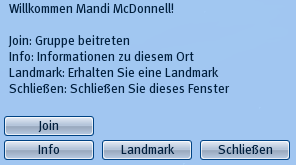
Let the VWB give a gift
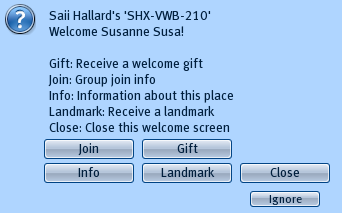 Image 4: Welcome menu with gift button
If you enabled that a visitor will be presented a menu, you can let the menu have a gift button (see image 4) by dropping an object into the contents of the vwb. There is no need to configure it, once you dropped an object into the contents, the gift button will automatically activate.
Test it with the self-test or with another avatar.
Do note that the object needs to be copyable and transferable, and only one object should be in the contents.
Group invitation with Smartbots
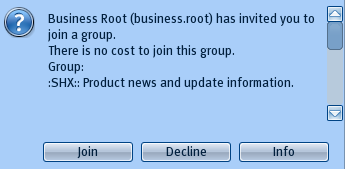 Group invitation via SmartBots
It makes it possible to have a bot invite someone directly, rather then having to click on the group link in chat.
SmartBots service allows you to rent a Second Life group invitation bot, which would give out a direct group invitation to all visitors of your parcel(s).
It is integrated in your VWB board for easy operation.
To start using this service, click the button below:
When you have registered your group, and it is activated (the bot is in your group and can invite), then you can start using it with your VWB board.
Open the [Smartbots] menu, and click on Check Group.
If everything is in order, it will display Active and Enabled, then people will get an automatic invitation on whatever method you have used. So for instance if they click on the join button, the bot is instructed to send an invite to that person.
You best remove the join message from the config, as it serves no function together with the bot.
If the menu says that it is disabled, make sure your .config has the following line in it:
SMARTBOTS: YES
Do note that the Test invite button will always invite you even if you are already in the group, it is a forced invite, different than actually the visitor invitation, which will only invite when they are not in the group yet.
 Image 6: Smartbots menu
Configuration settings: E-Mail & more
This board has a list of powerful settings that determine how your visitors will be greeted, what information will be send to you and how generated lists should be treated.
Also you have to enter your E-mail address to be able to receive statistics and/or visitor lists.
All these settings can be found in the .config notecard inside the boards contents (see image 3)
Since the settings are already explained inside the notecard itself, we will not repeat it here. For your convenience, there is a backup of the default settings included in the box, in case you mess up the one inside the board.
Do take care not to use some options together, so that your visitor will be spammed with many things. It will most likely work against you, if visitors get irritated by the spam.
Another note: Do not activate the statistics or visitor list, without having a valid E-Mail address in the config. Otherwise you will get errors.
Giving Managers and other people Access
You can set the access to the board to the group it is set too, to your own only or to group & managers.
The managers can be changed by editing the managers list notecard inside the board (see image 3)
To change the access, use the ACCESS menu (see image 7)
 Image 7: Access Menu
How it works
A list of visitors is build, so it will not send people more then one message, menu or invitation. This list is however limited to ~250 avatars.
If you disabled E-mail in the config, and the memory gets full (~250 avatars) the oldest (in visit time) visitor will be deleted, and the newest added to the queue (FIFO). If the memory reaches a certain critical point, it will reset the list to avoid a script error.
If you enabled the clear list per day option, the list will be cleared, just like it would have when you enabled the Email option at the turn of the day (SL time)
If you have a high traffic area, you best disable the list to email (not the statistics), since it will send a list every time it reaches around 250 visitors, causing a lot of Emails daily.
We took great care in making this product to use as minimal memory as possible and timed polling events to a minimum. Therefore you can be assured this is not using any noticeable script time.
Furthermore, if you enable stats to Email, it will have an addendum of the visitor count per language on a daily base.
This perhaps gives you the oppertunity to target specific groups of people in another language in your store, club/ place.
How do I test it?
You can use the self-test button in the main menu to see what menu/message or invitation a visitor would get normally.
Though it might be better to test the sensor range, group invitation etc with another avatar (your alt or a friend).
Test another language by changing the language of your viewer in preferences (needs a restart of the viewer).
The Menus
When you have worked your way through the setup, there are a few things you can do with the menus.
First of all there is a button in the main menu: Visitorlist, which will IM to you the currently stored visitorlist. (see image 8)
Do note that this list is wiped as soon as it sends the list via Email, if you have enabled that setting.
 Image 8: Main Menu
The options menu contains the group change button as described before, as well as other system functions.
Most buttons are self explanatory, but we do like to add that the Clear visitors does what it says: Clears the internal visitor list. It does not clear the counters, that is why there is a second button: Clear Counters.
Changing colors and fonts is purely cosmetic of course. But as a note: The color themes may not be to your liking, so we included a way to add your own colorset: Just edit the system colors notecard and click on custom list in the menu. (you have to load it first with reload >>)
The [Sensor] submenu is for changing the range of the sensor that detects new visitors. Use this with care, since it detects around the board in all directions. Setting it too high may be overlapping an area that is not owned by you and therefore intruding to someone else. Use common sense.
The Update button is for getting updates of course, but in some cases an update can only be obtained by rezzing the board at the update stations in our shop. Please join our subscriber group to stay informed about updates and how to obtain them.
 Image 9: Options Menu
Modifying the board
When you want to change the label texts, for instance to translate them into your language, use the following file:
Photoshop VWB label template
It has an extra top mask-layer where the positions can be seen where you have to place the texts.
Just edit it, remove the toplayer mask and save it into a TGA. Import in Second Life and replace the file in the contents of the VWB board: customlabels, then apply the font: custom. This font will (only) replace the background labels with the texture customlabels.
2.0 Default Configuration (.config)
# ====================================
# Config parameters 2.0
# Keep keywords in upper case, and place values behind
# the keyword after the : seperated by a space
# ====================================
# ORNAME: -> This will set the originating name shown when people get an IM from the VWB
# For example note the following, where the SHX VWB is changeable to any name you like:
# SHX VWB: Click here and press the JOIN button to join our group: #
# ====================================
ORNAME: SHX
# EMAILADDRESS: -> The Email Address to send lists and statistics to
# Tip: Use an automated forwarding script in your Email program to send the info to more people
# ====================================
EMAILADDRESS:
# DISPLAYNAME: -> Set to YES or NO to make use of Displaynames
# Default it is enabled
# ====================================
DISPLAYNAME: YES
# IGNOREGROUP: -> When set to YES it will not detect same group members
# Default it is disabled
# ====================================
IGNOREGROUP: NO
# INTERNALSENSOR: -> Set to ON or OFF to make use of the Internal Sensor
# Default it is enabled
# ====================================
INTERNALSENSOR: ON
# EXTERNALSENSORS: -> Set to ON or OFF to make use of External Sensors
# Default it is disabled
# ====================================
EXTERNALSENSORS: OFF
# GMTOFFSET: -> Set to the offset value of your time location. At midnight the stats will be send (if you enabled it)
# ie: for PDT the value would be: GMTOFFSET: -7
# for Deutschland/Nederland/France: GMTOFFSET: 1
# ====================================
GMTOFFSET: 1
# DST: -> Daylight saving time, set this to ON of OFF
# ====================================
DST: OFF
# EMAILLIST: -> Set to YES or NO to enable Emailing lists (visitor list in CSV format: datestamp,avatar name)
# A valid Emailaddress is required in the EMAILADDRESS parameter above
# ====================================
EMAILLIST: YES
# EMAILSTATS: -> Set to YES or NO to enable Emailing daily statistics (visitors, new daily residents,min/max residents online)
# A valid Emailaddress is required in the EMAILADDRESS parameter above
# ====================================
EMAILSTATS: YES
# CLEARLISTPERDAY: -> This will wipe the visitor list each day
# Only has effect when the Email is set to NO, since Emailing the list always will wipe the list
# ====================================
CLEARLISTPERDAY: YES
# VISITORTOTALOFFSET: -> Use this to start counting the total visitors from a certain offset
# Use this when you moved or did a reset, but want to retain the total visitor count
# Set to 0 to not use this option
# ====================================
VISITORTOTALOFFSET: 0
# SHOWMENUTOVISITOR: -> Show a menu to every visitor with Info, Landmark and Join info
# You will need to edit the information notecard and drop a landmark in the board (remove old landmarks!)
# ====================================
SHOWMENUTOVISITOR: YES
# WELCOMEMESSAGE: -> Gives a Welcome message to your visitor in IM
# leave the message blank to not use this feature
#
# Example:
# WELCOMEMESSAGE: Welcome %name%, touch any vendor to get detailed information of the product. Enjoy your stay!
# ====================================
WELCOMEMESSAGE: Welcome %name%, touch any vendor to get detailed information of the product. Enjoy your stay!
# AUTOGROUPINVITE: -> This will give the group invitation message to new visitors
# Although usable together with the Menu and Welcome message, take care not to give too much info to your visitors
# Not everyone is charmed to get spammed when visiting your place
# ====================================
AUTOGROUPINVITE: NO
# AUTOLANDMARK: -> This will give a landmark to every new visitor
# Although usable together with the Menu and Welcome message, take care not to give too much info to your visitors
# Not everyone is charmed to get spammed when visiting your place
# ====================================
AUTOLANDMARK: NO
# TOUCHTOJOIN: -> This will enable/disable the touch to join
# If you have a closed group to show, where you do not want people to touch to join,
# you can disable it here
# ====================================
TOUCHTOJOIN: YES
# SMARTBOTS: -> Enable or disable smartbot direct group invite
# Note that this requires that you have registered and activated (paid) for the smartbot service
# Smartbot website: http://www.smartbots2life.com/
# ====================================
SMARTBOTS: YES
# JOINMESSAGE: -> With this you can set the join message
# If for instance, your group is closed for enrollment, you can change the
# message into something like: Contact Saii Hallard to be added to the group! Click here: secondlife:///app/agent/9461d333-7c39-4c02-aeaf-9f44943b125e/about
# Leave this option blank, to not use a message
# Use the %grouplink% placeholder to display a link to join the group ie: Click here and press the JOIN button to join our group: %grouplink%
#
#
# When using Smartbots, make this message empty as the bot will message that it will invite anyway
# ====================================
JOINMESSAGE: Click here and press the JOIN button to join our group: %grouplink%
# SRWCHANNEL: 1 (to 36)
# The SRW channel is used only to have the board communicate with the SHX-Kuler-Themes for changing colors
# ====================================
SRWCHANNEL: 1