Placing the SB (Staff Board)
The product you received is 'boxed'. Rez the box by dragging it from your inventory onto an empty spot in world.
Left click the box to open it's content and do copy all to inventory. Take care not do this procedure with the actual board, because then you will end up having the scripts inside your inventory and a non functioning product.
You will now have a folder in your inventory called: [SHX-SBN3-200] or the like
Rez the Board (named ie.: SHX-SBN3-200) by dragging it from your inventory onto an empty spot in world.
First Use
First you want to power the board on. Do this by touching it and click on Power On.
If you see no change, you probably are staring at the backside, which has the big SHX logo on it. Turn the board around to see the front side!
How it works
The Staff Board is simple in use, yet powerful in options to customize it to fit your need.
In a nutshell will it display staff, hosts, managers or avatars for any purpose you give it, record their time online, record their time online in the same region on a daily base and optionally can send a report to your Email.
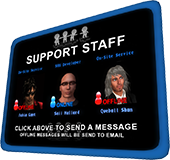
Visitors can see if someone if online or offline, and regardless of their status can click on the avatars image on the board to send a message.
The amount of messages send is stored daily as well and reported together with the time online.
Staff Member Images
To keep the aesthetics value, we have chosen to force you to put a texture inside the contents of the board in stead of pulling a profile image. It's best to ask your staff to send you an image with a black or white background (mention that they send it full perm) so it will look good on the board.
Keep in mind the position of the board, which are named "slots". Slot 1 will use the texture with the name ava1, the second slot ava2 etcetera. (see image 1) Drop the texture of the avatar you wish to show inside the board and rename it to the slot position you want to use. Remember to remove the same named texture first before renaming it.
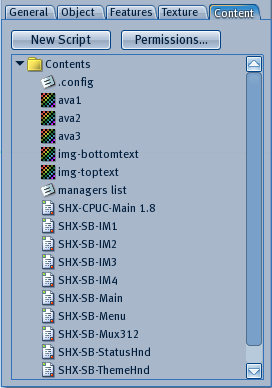 Image 1
Top and Bottom Image
The top and bottom image can be set by replacing the files: img-toptext and img-bottomtext inside the contents of the board (See image 1).
Inside the folder of the product you received you will find some examples for the top image. Of course you could make your own images. Make sure they are named exactly as shown in Image 1.
Default Size ratios:
img-toptext: 1024x241
img-bottomtext: 1024x117
Photoshop Templates for the Neutral images: click here to download
Managers
For convenience we will call the avatars you display on the board managers, but of course you can place hosts, club staff, after sales, live performers, or any people in a role that fits your need.
Before using it you probably want to set the managers, since you can quick select them to put on the board and/or have them also access the board.
You can set managers by editing the managers list notecard inside the board (see image 1).
If you have a SHX SRC Receiver, you can just click on GET DATA in the options menu to retrieve them.
The managers list notecard and the retrieve function are cumulative.
Placing your staff/managers on the board
To place managers on the board, or remove them, you click on the Staff button in the main menu (see image 2).
Use the > Clear < button to remove everyone from the display.
 Image 2
When you clicked on the Staff button you will see a menu similar as seen in Image 3.
Select a slot position.
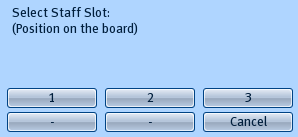 Image 3
Next you will be presented with a menu to chose whether you want to select a manager from the list of managers in the managers list notecard together with any managers you received from a SRC receiver, or if you want to enter the name of the staff member manually.
Optionally you can also use the same menu to remove a manager from the selected slot position.
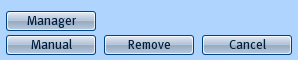 Image 4
When you selected a manager, it will search the avatar key (uuid) and when found will ask you their role or description.
This is a text that is displayed above the manager on the display and is informative only.
Enter a text up to 20 characters.
At the end you can review your selection, and have a chance to change the description.
Click YES to display the manager on the board and activate the online scanner.
Report to Email
To activate the report to Email function, you have to edit the .config notecard inside the boards contents (See Image 1). You will have to enter a valid Email address there and optionally can set the other options to set it to your timezone, so it will send the report at midnight in your time.
Options
The options menu (see image 5) has the following buttons:
- [Access] - To set who can access the boards menu
- [Themes] - To select a pre defined colour theme
- Product Info - To get the product type and version, and a link to this manual
- [Font] - To select a display font type
- Get Data - Use this to contact a SRC receiver and fetch the manager list
- Update - Check to see if an update is available
- Reset All - to reset all scripts
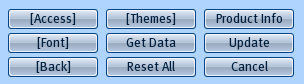 Image 5